STEP 1 |
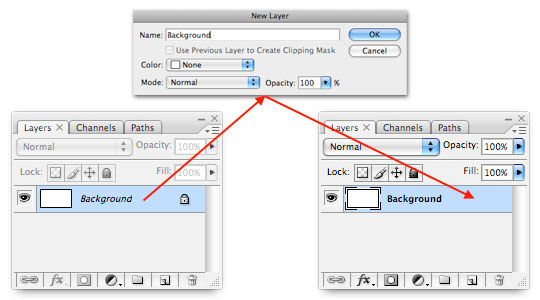
Lets go ahead and begin by opening a new document in Photoshop. Mine is 540×300 pixels at 72ppi. Since stitching on a plain white canvas is a little silly, lets go ahead and spice up the Background layer with a little texture. By default the Background layer in any new Photoshop document is locked, so lets go ahead and double-click on the Background layer in the Layers palette to bring up the Layer Properties dialog box. Simply rename the layer or name it Background once again and hit OK to unlock the layer. |
 |
STEP 2 |
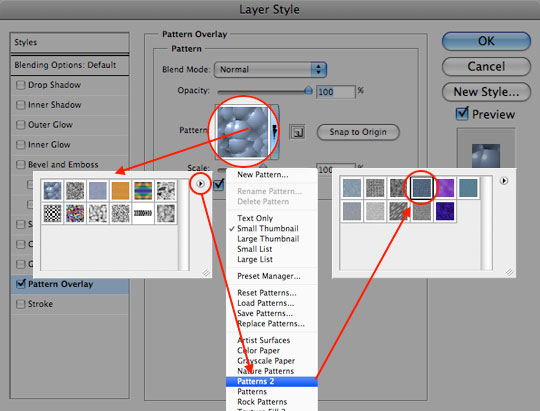
Now that our Background layer is unlocked we’re going to add a Pattern Overlay Layer Style to it which will give us a quick and easy denim background to work with. Control-Click (PC: Right-Click) on the Background layer in the Layers palette and choose Blending Options from the menu. This will bring up the Layer Styles dialog box. Click on the Pattern Overlay text in the left column. (You must click on the text and not on the checkbox. Clicking the checkbox will turn the style ON but it won’t give you the options for the style, so it is important to click on the text so we can modify the Pattern Overlay style options.) Next we need to load a new set of Patterns into the Pattern Picker. Click on the Pattern swatch to reveal the Pattern Picker, then click the little circle with the arrow in it at the top right corner of the picker. Choose "Patterns 2" from the list and click OK to load the new pattern set into the Pattern Picker. Now simply click on the Denim swatch which is the 4th pattern in the set and click OK to close the Layer Styles dialog box and commit the style to the layer. Yes, I know, this graphic is a mess… but hopefully it gets the point across. |
 |
STEP 3 |
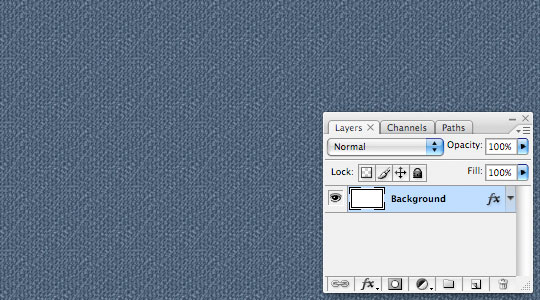
You should now have a background full of denim and a layer style icon in the Background layer of the Layers palette. |
 |
STEP 4 |
It’s now time to add some text to our document. Press the D key to reset the foreground color to black, then press the T key to invoke the Type tool. Click on the stage to place the cursor and type some text onto it. Notice that when you added the text that Photoshop automatically added a new layer for it. (*note: To commit the text you can either press the Enter key on the 10-key corner of your standard keyboard or click the Check-Mark in the Text Tool options bar at the top of Photoshop.) |
 |
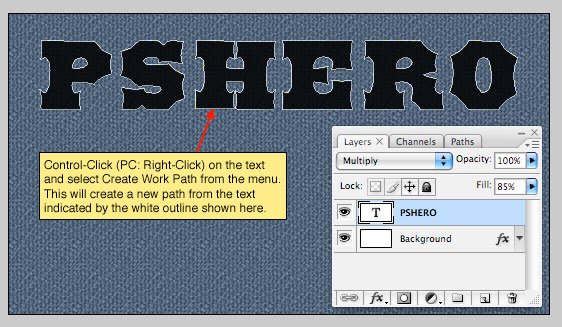
STEP 5 |
Now that our text is created and while we still have the Type tool chosen we need to create an outline path of the letters. Control-Click (PC: Right-Click) on the text on the stage and choose Create Work Path from the menu. This will create a white outline around each letter indicating that you’ve created a work path (obviously) which we will use later in the lesson to stitch around. |
 |
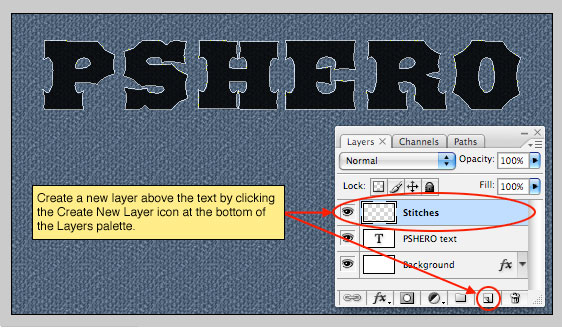
STEP 6 |
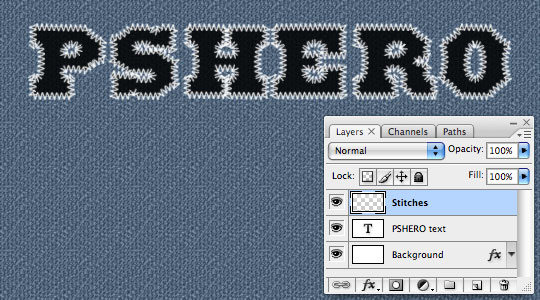
Add a new layer above your text by clicking the Add New Layer icon at the bottom of the layers palette or by using the keyboard shortcut Command-Option-Shift-N (PC: Ctrl-Alt-Shift-N). Rename the layer by Double-Clicking on the layers name in the Layers palette. I called this new layer Stitches. |
 |
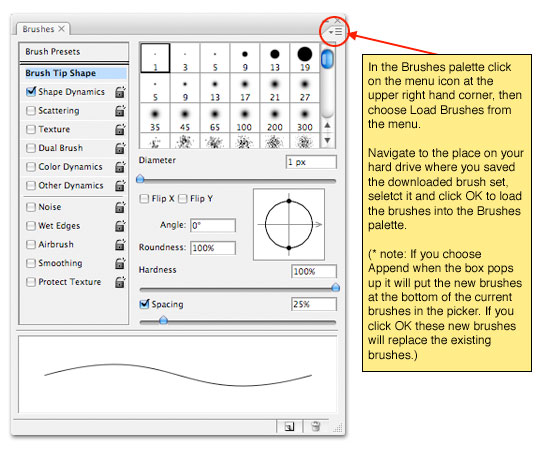
STEP 7 |
Now it’s time to setup everything in preparation for the stitching, and the first thing we need to do is load the stitching brush set into our Brushes palette. If you haven’t downloaded them yet you’ll want to do it now by clicking HERE. Save the brush set to your desktop or someplace you’ll remember when we go looking for them. Press the B key to invoke the Brush tool, then bring up the Brushes palette by choosing Window>Brushes from Photoshop’s main menu. In the upper right hand corner of the Brushes palette, click on the options icon and choose Load Brushes from the menu. Navigate to the brush stitches brush set that you just downloaded to your hard drive and click Load. You will then be asked if you want to Append the brushes to the end of your current brushes or if you want to replace the existing brushes by clicking OK. For my example I’m going to replace my existing brushes, but either option works fine. |
 |
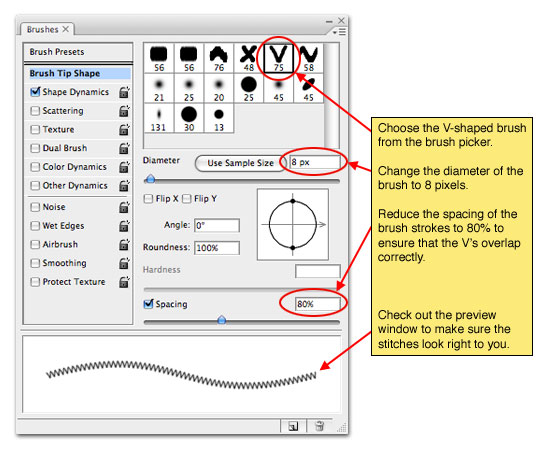
STEP 8 |
Now that the brush set has been loaded into the Brush Picker lets go ahead and select the V-shaped brush. We’ll need to make a few adjustments to the settings in the Brushes palette for this brush to make it work the way we want. First off lets reduce the size of the brush to around 8 pixels in the Diameter setting then make sure the Spacing checkbox is checked and that the spacing is set to around 80%. The spacing change makes the V’s overlap enough to look like interlocking stitches. |
 |
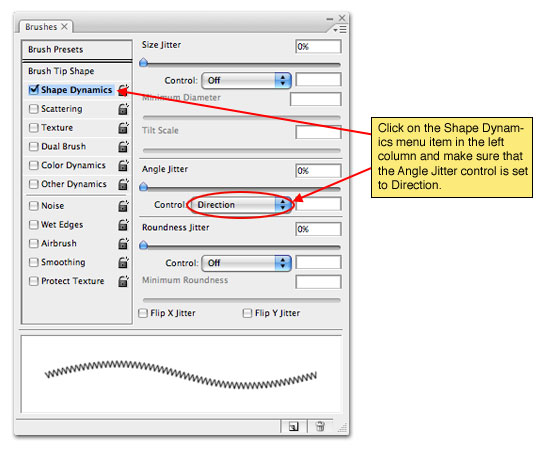
STEP 9 |
While still in the Brushes palette click down to the Shape Dynamics link on in the menu on the left and make sure that the Angle Jitter control is set to Direction. This will make the brush rotate as it goes around the corners to the different sides of our letters. |
 |
STEP 10 |
At last it’s time to make the magic happen. Put on your wizard hat and swap the foreground and background colors by pressing the X key (white should now be showing as the foreground color at the bottom of the Tools palette). Press the P key to switch to the Pen tool and then Command-Click (PC: Right-Click) anywhere on that little white outline that is the Path around the text. Choose "Stroke Path" from the menu, make sure that "Brush" is selected from the drop-down menu and that the Simulate Pressure checkbox is un-checked then click OK. You’ll now see that the brush we chose has been used to stroke the entire path of the text. Since we’re done with the path now you can either click over to the Paths tab in the Layers palette and delete it, or simply press Command-H (PC: Ctrl-H) to hid it. |
 |
STEP 11 |
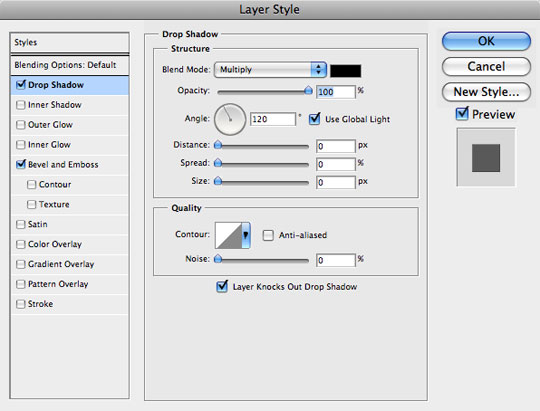
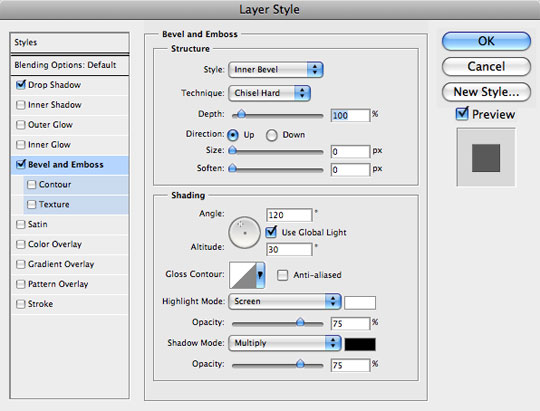
To make the stitches a little more realistic lets go ahead and add a few layer styles to the Stitches layer. Just like we did in Step #1 lets Command-Click (PC: Right-Click) on the Stitches layer and choose Blending Options. Now add a Drop Shadow and a Bevel and Emboss as shown below, be sure to check each setting to make sure you haven’t missed anything then click OK. The slight Bevel and Emboss will add a little more dimension to the thread while the Drop Shadow will add a touch of shading around the edges. |
  |
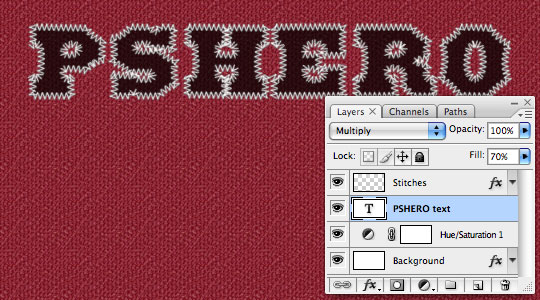
STEP 12 |
Before we move on let me show you a cool little trick to change the background color. Since the background is a preset color pattern and not an overlay we can’t just change an underlying layer color so we have to resort to other methods. Click on the Background layer in the Layers palette to make it the active working layer. Now lets add an adjustment layer by clicking on the Create A New Fill or Adjustment Layer icon at the bottom of the Layers palette (it’s the circle with half black and half white), choose Hue/Saturation and use these settings (or any that look pretty to you). |
 |
STEP 13 |
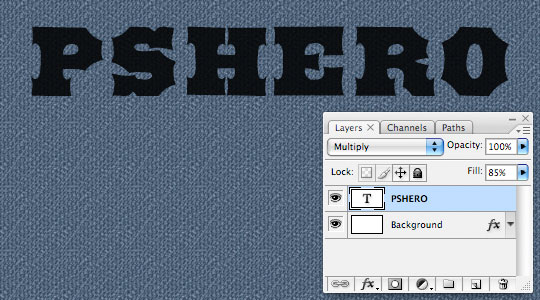
The last little bit of adjustment I did was to click over to the Text layer in the Layers palette and change it’s Blend Mode to Multiply and it’s Fill opacity to 70%. By doing this we allow a little of the denim texture to come through onto our black letters adding a little depth and realism. (*note: You could also paste some real fabric into a layer above the Text layer and use a clipping mask to add even more coolness.) |
 |
STEP 14 |
Anytime you’re using a text to create this effect you will always have an outline of the lettering, but what if you just want to stitch letters? Well, if you’ve got a little experience with the Pen tool you can apply this same technique to any number of paths you’ve drawn yourself. Below I’ve used the pen tool to draw some text. |
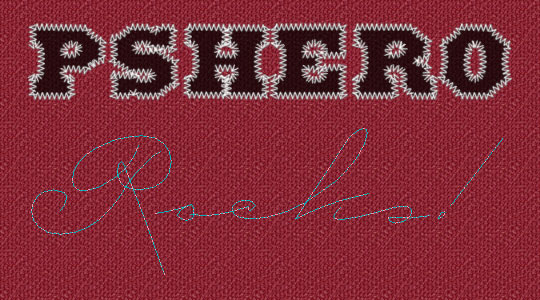 |
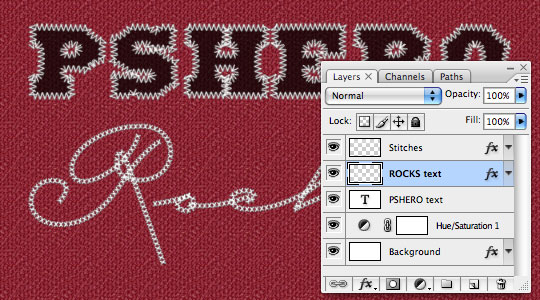
STEP 15 |
Then I switched to the Brush tool, lowered the diameter of the brush to 6 pixels, switched back to the Pen tool and Stroked the path just like we did back in Step 10. I then added the same Bevel & Emboss and Drop shadow to this new layer of stitches as we did to the original text. |
 |
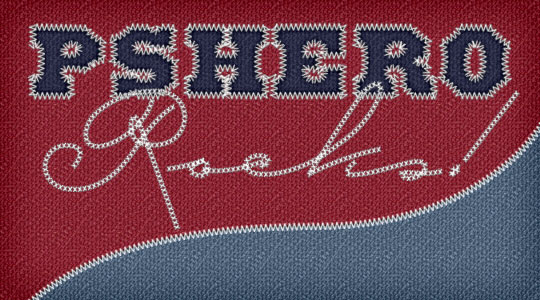
STEP 16 |
In my final image I simply embellished on the techniques we’ve learned. Check out the .PSD download to view all my final adjustments! |
 |
Archivo 95 mb aprox idioma español Requisitos WinXP El sistema Audaces Vestuario es la solución para la industria de la confección, desarrollado especialmente para agilizar los procesos de Diseño, Escalado, Trazo y Corte. Se compone de dos módulos, uno de Patrones y uno de Trazo. Patrones Audaces Patrones es un modulo realmente fácil de utilizar. El diseñador crea los moldes directamente en la pantalla del computador,sin uso de la mesa digitalizadora, de una forma rapida y eficiente,usando las innumerables herramientas de diseño disponibles.Adicionalmente, proporcionara la creación de moldes base dentro de los estándares técnicos de la industria, o sea con tablas de medidas,áreas de costura acondicionadas a los equipos de producción, estudios de encogimientos, etc. Escalado En Audaces Patrones se escalan los moldes con facilidad, precisión rapidez y seguridad. Trazo Audaces Trazo elabora Trazos con excelente aprovechamiento en pocos minutos. A través del Trazo automático, y pe...
Comentarios